The initial Windows installation finishes, and your Mac reboots. Now you’re staring at the installer. If it prompts you for a location, pick the partition labeled BOOTCAMP. Usually, the installer handles this automatically, formatting the drive for you without much fuss.
Finish the setup like you would on any standard PC. When the system restarts mid-install, it should land you directly back into the Windows partition. This is a good sign. Later on, you’ll need to know how to toggle between Windows and macOS, but for now, just let it boot.
Once Windows is fully running, another reboot occurs. This time, you’ll see a screen titled “Welcome to the Boot Camp Installer.” Do not skip this. Follow the on-screen instructions to install the necessary Apple software. These are the drivers that make your Mac’s hardware talk to Windows. Without them, your speakers might be silent, the microphone dead, and the webcam a black box.
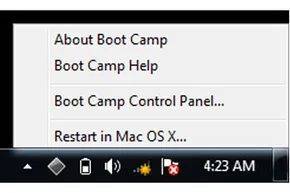
After the install completes, check the System Tray in the bottom-right corner of your screen. You’ll see a Boot Camp icon there. Do not delete it. This small icon is one of your two primary methods for switching between partitions.
How exactly does that switch happen? And what happens to your files when you jump back to macOS? The mechanics of toggling are next.