

Walking into a cinema today feels nothing like stepping into one seventy years ago. The image is sharper. The colors are vibrant. The ticket price hurts more. But the real shift isn’t visual. It’s auditory.
In the 1930s, sound was a flat, mono experience. You heard it all from a single speaker behind the screen. No depth. No direction. Just noise moving forward.
Today, you expect sound to wrap around you. To come from behind. To whisper in your left ear while an explosion cracks on your right. This isn’t just a luxury anymore. It’s the baseline for entertainment. And the tech that once lived only in expensive theaters is now standard in living rooms.
We’re going to break down the surround-sound systems that define modern cinema. Then we’ll show you how to build a setup at home that rivals the big screen.
The Evolution of Audio Immersion
The jump from mono to stereo was the first step. But true immersion required more. It required spatial awareness. Early Dolby systems introduced discrete channels. They isolated sounds. They gave them space.
This created a soundscape. Not just a soundtrack. The audience could locate a helicopter. They could hear footsteps moving across the room. It turned passive watching into active listening.
Home theaters chased this. The goal was simple: replicate the theater experience. Without the crowds. Without the popcorn smell. Just the audio.
Defining Home Theater Surround Sound
What exactly makes a system “surround”? It’s about channel count and placement. Standard 5.1 systems use five main speakers and one subwoofer. The “.1” is the low-frequency effects channel. That’s your bass.
The layout matters.
- Front left and right handle dialogue and main action.
- The center speaker anchors the voice.
- Surrounds create the atmosphere.
- The subwoofer handles the rumbles.
This setup creates a bubble of sound. You are inside it. Not just in front of it.
Why It Matters for Everyday Users
You don’t need a $5,000 setup to get it. But you do need to understand the basics. A cheap system with poor channel separation sounds like a mess. A well-tuned 5.1 system feels precise.
The difference is in the mix. Studios mix for these formats. If you ignore them, you lose the intent of the film. You miss the whisper. You miss the tension.
Building your own system lets you control that quality. It’s not just about buying speakers. It’s about placing them. And understanding how digital signals translate to physical sound.
We’ll start with the hardware. The receivers. The codecs. The actual boxes that make the noise. Because before you can hear the future, you need to plug it in.
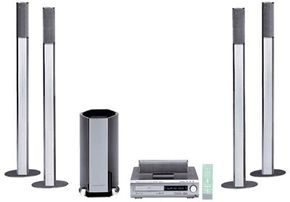
Mono was the original way to capture audio. It is still the simplest method. A single audio track feeds one speaker. Think of the spiraled groove in a vinyl record or the magnetic strip on tape. All the sound comes from one direction. Early sound movies relied on this. It worked. It was cheap. But it lacked depth.
Then came stereo. Two-channel recordings split audio between left and right speakers. This is the standard for home receivers, TV broadcasts, and FM radio. Technically, “stereo” is just one type of multi-channel recording. A specific type called binaural recordings uses two microphones at a live event. They mimic human ears. You wear headphones or use separate speakers. The result feels like you are in the crowd.
Beyond Stereo
Surround recordings add more channels. Sound arrives from three or more directions. The term “surround sound” often refers to Dolby’s specific systems. Most people use it as a generic label for multi-channel home theater setups. We will use it that way here.
You might think special microphones capture this naturally. They exist. But studios rarely use them for movies. Instead, sound editors and mixers build the experience in a mixing studio. They take separate tracks. Dialogue from the set. Sound effects from a dubbing studio or computer. The musical score. They decide which channel gets what. This is where the magic happens.
“Sound panning involves fading a sound from one audio channel while building it on another.”
Early Surround Experiments
Walt Disney’s Fantasia (1941) changed expectations. It immersed audiences in classical music. Sound engineer William Garity recorded each orchestra section separately. He mixed them into four distinct audio tracks. These were optical tracks on a separate film reel.
The system drove speakers placed around the theater. Music seemed to move. This was sound panning. A violin melody would fade out on the left while growing louder on the right. To show it, theaters needed an extra projector for the soundtrack. They also needed expensive receivers and speaker assemblies. The technology was called “Fantasound.” It was impressive. It was also prohibitively expensive. Most theaters could not afford it.
By the late 1950s, Hollywood moved to simpler multi-channel formats. Systems like Cinerama and Cinemascope emerged. They used different visual tricks. But the sound technology was largely the same. These systems were grouped under stereophonic sound. Or simply, theater stereo.
Stereophonic Sound
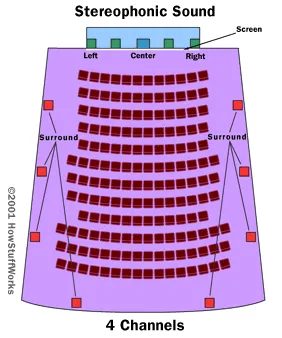
Film sound didn’t just get louder in the 1970s; it got spatially complex. Before digital audio took over, studios relied on stereophonic sound systems that used analog magnetic audio tracks. These weren’t the pristine optical stripes you saw on standard prints. Instead, engineers placed four or more magnetic strips around the edges of the physical film strip.
There was a trade-off. Magnetic tracks couldn’t match the crystal-clear fidelity of conventional optical audio. They were prone to degradation, fading into hiss as the reels aged. But the space-saving advantage was undeniable. A standard film frame had room for only two optical tracks. Magnetic strips? You could squeeze in up to six of them by utilizing the empty space around the frame.
The Speaker Configuration
This extra bandwidth allowed for a richer audio experience. The stereophonic setup typically drove three to five channels of speakers positioned behind the movie screen. The most popular configuration was a four-channel system.
Here is how that four-channel layout usually worked:
– Left speaker : Handle audio for the left side of the screen.
– Right speaker : Handle audio for the right side.
– Center speaker : Anchor the dialogue and action.
– Surround speakers : Placed along the sides and back of the theater for ambient effects.
Some premium systems pushed this further to five channels behind the screen, plus a dedicated surround channel.
Where the Sound Lives
In these productions, the majority of the audio was routed to the front channels. This ensured that dialogue appeared to originate directly from the actors on screen. If a character stood on the left, their voice came from the left speakers. On the right? The audio shifted accordingly.
The center channel was critical. It served as the sonic anchor, focusing the sound squarely on the visual action. Meanwhile, the rear tracks were reserved for “effect sounds.” This included ambient background noise, distant crashes, or voices calling from off-screen. This separation created a sense of depth that simple mono or even stereo couldn’t replicate.
The Dolby Intervention
By the 1970s, the industry needed a better way to manage these complex tracks without losing clarity over time. Dolby Laboratories stepped in with a new sound format. It built on the same physical configuration but introduced processing techniques that cleaned up the magnetic hiss and maximized dynamic range. This shift set the stage for the dynamic Dolby systems that would become the new standard for theater sound.
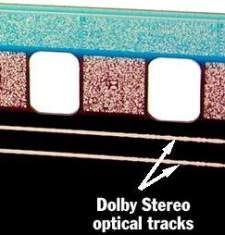
Dolby Stereo didn’t just tweak audio. It rebuilt how theaters handled sound. The setup kept three front channels and added a dedicated surround channel. That structure mimicked stereophonic sound but went further.
Earlier systems relied on magnetic tracks. Those were messy. They degraded quickly. Dolby switched back to optical tracks. The technology was older but far more reliable. The physical film strip carried the audio data in a clear, consistent way. Playback became noticeably cleaner.
There was another upgrade inside the signal. Dolby introduced an advanced noise-reduction process. This cut through the static that usually plagued analog recordings. The result was sharper, more defined audio.
Why Optical Tracks Won
The shift to optical tracks wasn’t just about nostalgia. It was about quality. Magnetic strips wore out. They picked up debris. Optical tracks, etched into the film itself, stayed stable. This made installation simpler for theater owners. They didn’t need complex magnetic calibration. The standard stuck because it just worked better.
Engineering Immersion
Better sound meant directors could do more. George Lucas saw the potential early. Star Wars was one of the first films encoded specifically for this Dolby Stereo format. The goal wasn’t just background noise. It was spatial awareness.
Sound engineers used the surround channel to create movement. Imagine a space battle. TIE fighters weave through debris. The audio wasn’t static. It panned. Sound moved from the front speakers, across the room, and into the rear channels.
“By gradually panning the sound of fighter ships from the front channels to the rear channel, sound engineers made it seem like the ships were flying off screen over the audience.”
This technique changed viewing habits. You stopped just watching the screen. You started feeling the space around you. The ships didn’t just appear in the corner of your eye. They flew past you.
It was a simple trick. But it redefined what movie-going could be. The technology was analog. The effect was immersive.
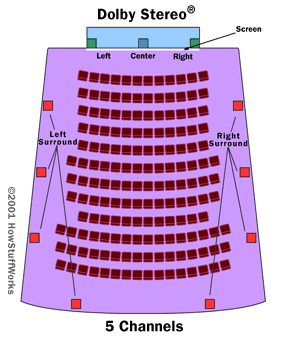
Filmmakers quickly realized that surround sound wasn’t just a gimmick. It became a storytelling tool. Movies started following the “Star Wars” blueprint. They used the extra audio channels to create fantastical effects. Background noise filled in to establish where the scene was happening. This added depth that mono or stereo couldn’t match.
Later iterations of the system gave theater owners an upgrade. They could hook up a subwoofer. This unit handled extremely low-frequency sounds. A crossover unit separated these deep rumbles from the main audio tracks. Directors loved it. They used the subwoofer to create powerful rumbling. When an explosion hit the screen, the audience felt it in their seats. Earthquakes shook the theater. This channel is technically known as the low frequency effects (LFE) channel. It exists in both analog and digital surround systems.
Home Theater Evolution
The technology didn’t stay in cinemas. In 1982, Dolby launched Dolby Surround ® for home entertainment. It replicated the theater experience, but the delivery method changed. Instead of optical tracks on film, audio was encoded as magnetic tracks on video tape. It also worked over broadcast television signals.
The speaker setup mirrored theaters, but with a catch. The original home system had only three channels. Left speaker. Right speaker. Rear speaker. There was no center channel.
That changed in 1987. Dolby introduced Dolby Pro Logic ®. It added a front central speaker channel. This improved dialogue clarity and anchored the soundstage. If you want to dive deeper into the setup, check out How Home Theater Works. But the real magic isn’t the hardware. It’s the encoding process.
The 4-2-4 Innovation
Dolby Stereo’s true breakthrough was packing four distinct audio channels into a tiny space on the film strip. The engineers faced a physical limit. They could only fit two optical tracks in the available area. They needed four channels. They had two tracks.
The solution was a special 4-2-4 processing system. This wasn’t new. It originated in quadraphonic home stereo recordings from the early 1970s. The concept was simple in theory but complex in execution. Four channels of audio information were encoded into two tracks.
The decoding process then reconstructed the four channels at playback. It preserved spatial cues. It maintained separation. It made the sound feel wider than the physical space allowed.
Four From Two
The trick lies in phase differences and matrix encoding. By shifting the phase of specific frequencies, Dolby could distinguish between left and right rear channels on a single track. The center channel was derived by summing the front left and right signals. It was a clever hack. One that allowed cinema-grade immersion without requiring wider film stock.
The result was a system that felt expansive. Listeners heard sounds panning across the screen. They heard effects coming from behind. All from two narrow strips of acetate.
It changed how we consume movies. It set a standard that digital formats like Dolby Digital and DTS would eventually surpass. But the foundation remained the same. Compress complexity into simplicity. Make the invisible audible.
Why does this matter today? Because every time you hear a bass drop in a theater or a
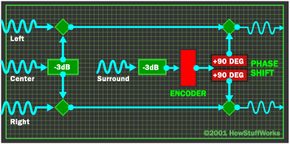
The core mechanism of a 4-2-4 processing system relies on a simple premise: you start with two input streams, but you need four distinct output channels. The logic splits these two streams into four specific data points. First, you have the raw content of stream A. Second, you have the raw content of stream B. Third, you identify what is identical in both streams. Fourth, you isolate what differs between them.
The first two are easy to visualize. Stream A drives the left speaker. Stream B drives the right speaker. The other two channels—“same” and “difference”—require understanding how speakers actually create sound.
How Speakers Move Air
At its heart, a standard speaker is an electromagnet. Picture a metal cylinder wrapped in a coiled wire. This coil sits inside a permanent magnet. When electrical current flows through the wire, the coil becomes magnetized. It develops a north pole and a south pole.
The wire connects to the amplifier via positive (+) and negative (-) terminals. The amplifier doesn’t send a steady current. It constantly flips the direction of the flow. This flips the magnetic poles rapidly.
This flipping changes the magnetic attraction between the coil and the permanent magnet. The coil moves back and forth. It pushes and pulls a speaker cone. The cone pushes air out, then pulls it back in. This vibration creates the sound waves we hear.
An audio signal is just this fluctuating current. One direction moves the cone in. The other moves it out. The pattern of fluctuation determines the sound’s frequency and amplitude. We see this as an oscillating wave.
The Center Channel Problem
In a surround-sound setup, the center channel is unique. Its signal is not unique to one side. It is recorded on both stream A and stream B. The amplitude and frequency are identical. The timing is synchronized perfectly.
This creates a specific acoustic phenomenon. When two identical sound waves are played simultaneously through two separate speakers, they combine. If they are perfectly aligned, they reinforce each other. This is known as being in phase.
If the waves are inverted relative to each other, they cancel out. This is phase cancellation.
The 4-2-4 system exploits this. The “same” information (the center channel) exists in phase across both streams. The “difference” information (side channels) exists as a phase shift or amplitude variance between them.
Decoding the Difference
To get the four streams back out, the system performs simple arithmetic on the electrical signals.
- Left Channel : Take stream A. Add stream B. Subtract the difference signal.
- Right Channel : Take stream B. Add stream A. Subtract the difference signal.
Wait. That’s not quite how it works in practice. The “same” and “difference” channels are encoded into the A and B signals before transmission. The decoder must reverse the process.
If stream A contains L + C (Left plus Center) and stream B contains R + C (Right plus Center), then:
– Adding A and B gives L + R + 2C.
– Subtracting B from A gives L - R.
The 4-2-4 scheme is more complex because it preserves spatial cues. It doesn’t just sum and subtract. It encodes the center channel to be recoverable only when both streams are present. The “difference” channel carries the ambient and rear information. The “same” channel carries the direct, on-screen dialogue.
Why Phase Matters for Surround Sound
You might wonder why we don’t just send four separate streams. Bandwidth is limited. Signal degradation is real. By encoding four channels into two, you reduce the
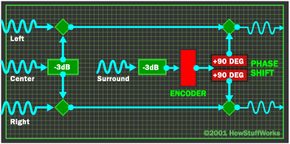
How Phantom Center Channels Work in Surround Sound
When you feed a surround decoder into a system that actually includes a physical center speaker, the logic is straightforward. The device scans the A and B audio streams for identical signals. It looks at the pattern. It checks the amplitude. If the data matches across both channels, the decoder routes that signal to the center speaker. Simple.
But what happens when there is no center speaker in the room?
The decoder still tries to create one. Because the signals in stream A and stream B are perfectly balanced and in phase, they construct a phantom speaker. This is an acoustic illusion. Your brain interprets the sound as coming from a source located directly between the left and right speakers. It anchors the dialogue or lead instrument in the middle of your field of view. You don’t need a third box to hear a third voice.
Why Surround Channels Cancel Out in Front Speakers
The rear or surround channels operate on a completely different principle. The audio information for these channels is also encoded in both stream A and stream B. But here is the catch. The identical signals are out of phase.
They are shifted in time. They do not play in synchrony.
Instead of reinforcing each other, these signals work against one another. Think about what happens at the speaker cones. When the signal in stream A commands the left front speaker to push outward, the signal in stream B commands the right front speaker to pull inward.
The result is that the surround signal information coming from the front left and front speakers largely cancels itself out.
This phase cancellation means the front speakers don’t really “hear” the surround mix. They are busy fighting each other. The energy dissipates or cancels before it can be perceived as distinct front-channel audio. This is intentional. It keeps the background ambience from bleeding into the foreground clarity. You hear the surrounds in the room’s acoustics, not projected from your front stereo.
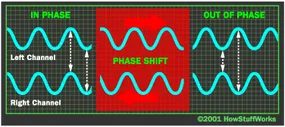
The Phase Cancellation Trick
You feed both Stream A and Stream B into a surround-sound decoder. Its job? To shift them relative to each other until those surround signals line up in phase.
It works. Kind of.
But here’s the catch. While the surrounds lock in, the stereo image breaks. The right, left, and center channels all end up out of phase with each other.
When these channels are out of phase, they tend to cancel each other out.
That’s not a glitch. It’s a side effect. The result is a loss of front-center audio. You get the ambience, but the dialogue and lead instruments might vanish or sound hollow. It’s a trade-off between spatial width and vocal clarity.
If you’re building a system that handles this decoding, you need to account for that phase shift. Otherwise, your listeners will wonder why the lead singer disappeared.
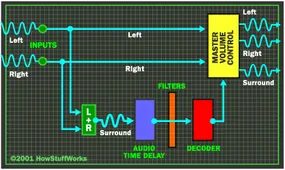
Surround decoders don’t just split signals. They run them through filters. Noise-reduction circuits kick in too. The goal is simple: balance levels. Cut the hiss.
Pro Logic adds another layer. It uses active steering elements. This gives you tighter control over where the sound comes from. If you want the deep dive, the official Dolby documentation on Pro Logic principles is worth a look. It’s dense, but it explains the mechanics.
Accessing the Surround Channel
Home audio hobbyists got creative. They realized you didn’t need a full receiver. A standard two-channel stereo could unlock the center and surround channels. You just add a decoder and a pair of extra speakers.
It’s a bare-bones setup. But it works. The decoder takes your left and right tracks. It extracts the hidden phase information. It sends that data to the new speakers. The result is a wider soundstage. Not quite cinema-grade. But enough to make a difference.
Next, we’ll break down the wiring. How you connect those extra speakers changes everything.
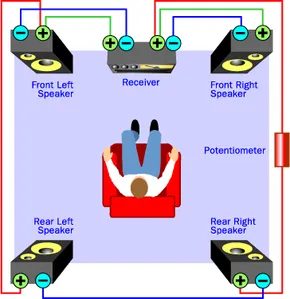
You don’t need a dedicated receiver to get surround effects. The standard approach involves buying a receiver with a surround-sound decoder. These boxes handle the heavy lifting. They spot out-of-phase audio data, pull it into a third channel, and boost it to the right level. They also add a tiny time delay to make the spatial effect stick.
But you can hack this with a basic stereo receiver. All the data is already buried in the left and right channels. You just need the right wiring.
Wiring Rear Speakers for Analog Surround
This method requires a pair of rear speakers. Place them to the left and right of your listening position. The wiring is specific. Connect the positive amplifier terminal for the right channel to the positive speaker terminal on the right rear speaker. Do the same for the left side. Then, connect the negative terminals of the two rear speakers together.
The physics here is simple. Stereo signals that are in phase cancel each other out at the rear speakers. The positive currents from both channels arrive at the rear speaker terminals at the exact same time. They neutralize each other. The electromagnet inside the rear speaker stays still.
Out-of-phase signals tell a different story. They create an alternating current. The current flows out of the left amplifier’s positive terminal while simultaneously flowing into the right amplifier’s positive terminal. This differential pushes the electromagnet in the rear speakers. You get sound.
Adding a Center Channel and Volume Control
For a complete setup, you need a central speaker. It anchors the front stereo image. If you have a mono TV, it naturally mixes both channels. A stereo TV works too, since both speakers sit near the screen.
You also need a potentiometer. This is a variable resistor. It adjusts the current’s resistance, lowering the voltage in the circuit. In this context, it acts as a volume knob for the rear speakers. Hook it anywhere in the circuit leading to the rear speakers.
This DIY approach won’t match the fidelity of a proper surround-sound decoder. It’s a crude simulation. But it’s an excellent way to understand analog surround mechanics. If you want detailed instructions on building this system, Chris Kantack’s Surround Sound Information Source is the place to look.
The Shift to Digital Theater
This analog method is a relic. In the 1990s, theaters started adopting new systems. These digital formats began replacing the standard 4-2-4 analog approach. We are moving into a new era of sound.
Digital Domain: DTS
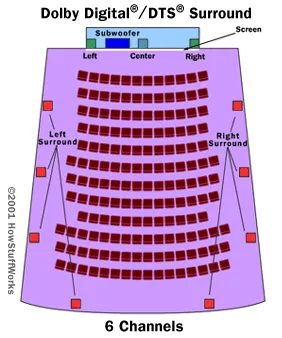
Most modern theaters are built around digital surround-sound systems. This isn’t just a marketing buzzword. It represents a fundamental shift in how audio is stored and played back.
Analog recordings treat sound as a continuous, fluctuating wave. Digital recordings? They break sound down into binary code. Ones and zeros. This digitization allows for significantly higher data density. The result is audio that is crisper. More precise. Less noise.
This shift didn’t happen overnight. The industry took a massive leap forward in 1993 with the release of “Jurassic Park.” That film introduced the public to DTS Digital Sound®. The system is named after Digital Theater Systems, the company that patented the technology.
How DTS Splits the Audio
DTS operates on a different architecture than its analog predecessors. It uses six separate audio channels encoded onto one or two CDs.
The theater hardware handles the rest. A CD player reads the disc. A decoder then splits those channels. The signal is routed to speakers arranged specifically throughout the room.
Like Dolby Stereo, DTS places three channels in the front. It also includes a subwoofer for low-frequency effects. The difference lies in the surround sound. Instead of a single, monolithic rear channel, DTS uses distinct channels. One for the left side. One for the right side. This separation creates a more immersive, directional soundscape.
The Sync Problem
How do you keep audio in sync with film when they are stored on different media? You use a time code.
The time code is a series of dots and dashes printed along the side of each film frame. It is invisible to the naked eye but critical for synchronization.
Here is how the process works:
- An optical reader mounted on the projector shines an LED onto the film strip.
- Light passes through the time code dots and dashes.
- A photocell catches the passing light.
- The photocell converts these flashes into pulses of electrical current.
- These pulses go to the DTS processor.
The processor reads the dash pattern. It matches this pattern against the code embedded on the CD. The processor constantly adjusts playback to ensure the two codes remain locked. The sound and picture stay together.
Digital Domain: Dolby Digital
While DTS took the cinematic lead in ’93, another player was preparing to dominate the market. The technology was simpler in distribution but equally complex in execution.
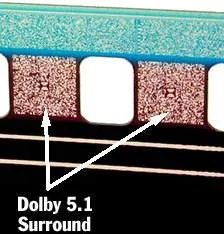
Dolby didn’t stay behind. They launched Dolby Digital, a format that eventually became the industry standard for home theater and cinema alike. You might know it by its channel count—Dolby Digital 5.1 —or its technical origins like Dolby AC-3 and Dolby SR-D. It matches DTS in speaker layout and sheer power, five channels plus a bass-heavy subwoofer, but the delivery method is where things get weird.
DTS stores audio on the CD. Dolby Digital buries it in the film itself.
Reading the Light
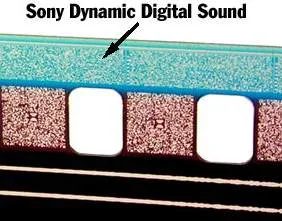
The data lives in the strips of space between the sprocket holes along the edge of the film reel. It’s not magnetic. It’s optical.
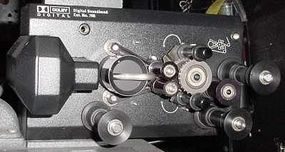
As the film moves through the projector, a reader unit shoots an LED light through these tiny patterns. On the other side, a charge coupled device (CCD) waits. This is the same sensor found in digital cameras. It doesn’t see a picture. It sees a binary code.
Hundreds of little specks register as 1s. The spaces between them are 0s. The CCD captures this image and sends it to a processor. The processor translates the light and dark patterns into an audio signal. It’s a clever hack. You’re watching a movie, but you’re also reading a barcode made of light.
Why This Matters for You
Most people assume soundtracks are just added to the video track. They aren’t. With Dolby Digital, the audio is physically part of the celluloid. This means you don’t need a separate decoder disc or a hard drive to get 5.1 sound in a theater. The projector does the work.
Does this mean Dolby Digital is better than DTS? It depends on what you value. DTS offers higher bandwidth because it’s stored on a digital medium. But Dolby Digital’s optical system is robust. It survives wear and tear better than magnetic strips. And for decades, it was the only game in town for big-screen experiences.
The technology might seem dated now. Streaming has replaced reels. But the logic remains. We still want discrete channels. We still want subwoofers. We just stopped digging for bits in the film strip.
Why did they switch from optical to digital storage? Bandwidth. Optical systems have limits. Digital files do not. But for a long time, the film strip was enough.
Now you just push a button and let the server handle the heavy lifting. The specks are gone. The signal is cleaner. But the goal is the same. Five speakers. One sub. Total immersion.
Dolby Digital Surround EX isn’t a brand-new format. It’s an extension. Think of it as Dolby Digital with an extra channel.
That extra channel does one specific thing: it drives a speaker on the rear wall.
In a standard 5.1 setup, you have left, right, center, left surround, and right surround. That’s it. Surround EX adds a dedicated center rear speaker. It sits between the left and right rear speakers.
This channel anchors sounds from the left and right surround channels.
Why does this matter?
Because it fills the gap.
Without it, the rear soundstage feels like two separate zones. Left rear. Right rear. The transition between them can feel disjointed. With the center rear channel, you get a continuous sweep. Sounds pan smoothly across the entire back wall. It’s like adding a missing piece to a puzzle.
The effect is subtle but noticeable.
Imagine a helicopter flying from your left side, over your head, to your right. In a standard setup, it might dip slightly as it passes behind you. With Surround EX, the path is wider. More immersive.
It doesn’t change the content. It just expands the playback.
Digital Domain: SDDS
Now let’s look at the other major player from the same era: Sony Dynamic Digital Sound. SDDS.
Sony called it SDDS. Theaters called it SDDS. You’ve probably seen the logo on the screen before the movie starts. It looks like a little box with waves coming out of it.
SDDS was Sony’s answer to Dolby and DTS.
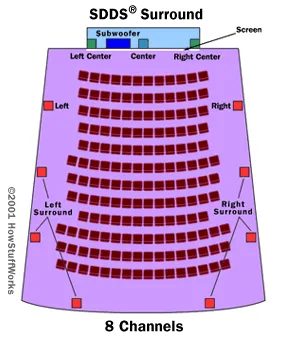
Here’s the weird part: SDDS had more channels than Dolby Digital.
Dolby Digital gave you 5.1 channels (plus LFE). DTS gave you 5.1. SDDS gave you 8.0.
Wait. Eight channels?
Yes.
SDDS added two more surround channels. One for the far-left rear and one for the far-right rear. So you didn’t just have left and right surrounds. You had four surround speakers total.
That’s 7 full-range speakers plus a sub.
Most theaters didn’t use all eight.
Why? Because installing four rear speakers is expensive. And most movies were mixed for 5.1.
So SDDS often played back the same 5.1 mix. But it could do more.
If a film was mixed specifically for SDDS, you’d hear a wider rear soundstage. Not just left and right. More like a full circle of sound behind you.
But here’s the catch: SDDS was stored on the 35mm film itself. Specifically, on the outer edges of the film strip.
Dolby Digital and DTS used digital audio. Dolby on the magnetic stripe. DTS in the CD-ROM track synced to the film.
SDDS hid its data in the film emulsion. Tiny dots. Hard to read.
If the film was damaged, SDDS sound would drop out. Dolby and DTS were more robust.
That’s one reason SDDS faded away.
Dolby Digital
The Hidden Data Tracks in Your Movie Theater
Sony didn’t just want to enter the digital sound race. They wanted to win it by building something more robust than the competition. Enter Sony Dynamic Digital Sound (SDDS). It’s an older format now, but its architecture reveals why audio engineering matters when the lights go down.
Most people know Dolby Digital. SDDS plays by similar rules but with a different physical setup. It splits audio into eight distinct channels. Five sit at the front of the theater. Two handle surround. One drives the subwoofer. That’s eight channels total. The spread creates a wider soundstage than what came before.
The data lives on the film itself. Not on a hard drive. Not on a disc. On the strip of celluloid. SDDS encodes information using high-contrast patterns. Light areas. Dark areas. A physical barcode for your ears.
Here is where the hardware gets interesting. The reader uses a laser on one side of the film. An array of photocells sits on the other. The laser fires through the transparent parts. It hits the sensors. The opaque parts block the beam. The sensors that get no light pass a tiny current. The exposed ones stay silent. The processor reads this on-off pattern. It translates the pulses into sound. Simple physics. Complex result.
But the real differentiator isn’t the laser. It’s redundancy. SDDS includes two identical digital tracks on the film. Why? Error correction. If dust gets on the film. If a frame scratches. If the laser reads a glitch. The system has a backup copy. It cross-references the data. It fills in the blanks. Other formats at the time relied on single tracks. SDDS bet on redundancy.
This matters because film degrades. It gets dirty. It gets worn. A single-track system might skip. Or stutter. SDDS could often smooth it out. It kept the audio clean even when the physical medium was imperfect.
You won’t see this in new theaters. The industry moved to DCP (Digital Cinema Package). But SDDS proved that analog media could carry digital complexity. It showed that redundancy isn’t just a software feature. It can be baked into the filmstrip.
So next time you hear about “8.0 channel” audio, remember that some of this started with light passing through plastic. And why. Because silence is expensive. Especially when it’s supposed to be surround sound.
The Digital Shift in Home Audio
Dolby and DTS didn’t just stick to theatrical releases. They brought their popular formats home. You can also find SDDS Surround 7.1 available for consumers. That system uses seven audio channels plus a subwoofer. It adds depth to the listening experience.
Digital sound cannot be recorded on video tape. Conventional cable broadcasts don’t carry it either. DVD is the only medium that encodes this information. Satellite systems broadcast digital sound too. Digital cable does as well.
If you want to understand these home systems better, check out How Home Theater Works.
Why Surround Sound Matters
For movie fans, surround sound is essential. It is part of the theater experience. Filmmakers know this. They include the surround mix in the production process. It is a crucial step.
Surround sound expands movies into three dimensions. The audience sits in the middle of the action. Nothing else achieves this effect.
Where to Learn More
Learn more about surround sound. The links on the next page cover its history. They also detail technical aspects of particular systems.
Related HowStuffWorks Articles
- How Home Theater Works
- How Movie Sound Works
- How Speakers Work
- How THX Works
- How IMAX Works
- How Digital TV Works
- How HDTV Works
- How DVDs Work
- How Analog-Digital Recording Works
- How Hearing Works
- Partner Links
- Surround Sound Showdown
More Great Links
- Dolby Laboratories
- Chris Kantack’s Surround Sound Information Source
- How to Design a Digital Surround Sound Processor
- History of “Fantasia”
- ExtremeTech: Surround Sound